
Designing Acoustical and Fire-Rated Soffits: Two Sound Isolation Approaches
Soffits can add important architectural detail to a space, but they can also create challenges when a ceiling assembly needs to meet both acoustical and fire-resistance requirements.
In working with architects, designers, and contractors, PAC International has seen an increasing number of projects incorporating soffits into acoustically rated ceiling assemblies. The challenge is determining how to integrate the soffit without compromising the isolation provided by the primary ceiling.
Two approaches can help address these requirements:
- Soffits integrated with an RSIC-1® isolated ceiling
- Soffits integrated with a spring-hung ceiling using RSIC-SI-CRC EZ®
While both approaches can provide effective sound isolation, the appropriate solution depends on the required acoustical performance, structural loading, fire requirements, and overall assembly design.
Why Soffits Can Create Acoustical Challenges
A ceiling assembly is only as effective as its weakest connection.
When a soffit is attached to or penetrates an isolated ceiling, it can create additional paths for structure-borne sound to bypass the isolation system.
This is particularly important when the primary ceiling is designed to provide high levels of sound isolation.
The goal is to maintain as much separation as possible between the isolated ceiling and the surrounding structure while still providing the structural support necessary for the soffit.
For this reason, the design and installation sequence matter.
Approach 1: Soffits in RSIC-1 Isolated Ceilings
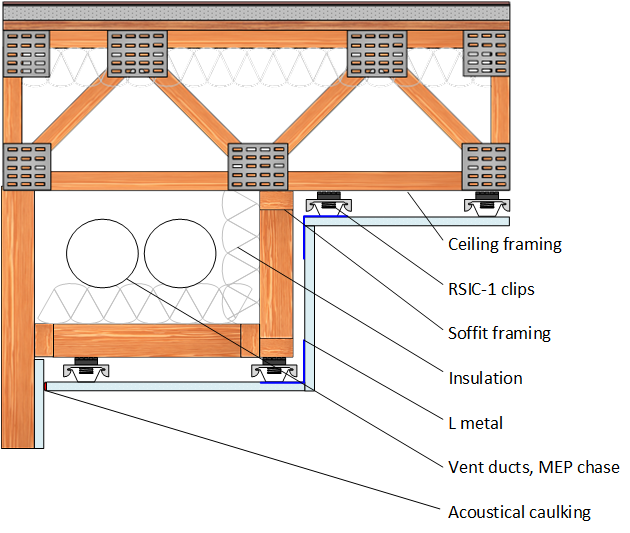
One approach is to create a fully isolated ceiling using RSIC-1 isolation clips and furring channel, with the soffit framed below the isolated ceiling.
The primary ceiling runs continuously across the space, including through the area where the soffit will be constructed.
This approach helps maintain the continuity of the isolated ceiling and minimizes opportunities for sound to bypass the isolation system.
Start With the Complete Ceiling
The first step is to frame the ceiling structure completely.
Once the framing is in place, the RSIC-1 isolation clips and approved furring channel are installed according to the PAC installation requirements.
The isolated ceiling can then be finished with the specified layers of gypsum board.
The key consideration is maintaining the isolation of the primary ceiling.
Whenever possible, the primary acoustical ceiling should remain free of penetrations.
Penetrations for lighting, electrical devices, HVAC, and other building services can create additional sound transmission paths, so they should be carefully evaluated and detailed.
Creating the Soffit Transition
Once the primary ceiling has been isolated, the soffit can be framed below it.
One method is to use L metal to create the horizontal-to-vertical transition between the ceiling and the soffit.
Depending on the design, RSIC-1 clips can also be incorporated into the vertical plane of the soffit framing when additional isolation is desired or when the L-metal approach is not appropriate.
This flexibility allows the designer to adapt the isolation strategy to the geometry of the soffit.
Don’t Forget the Acoustical Seal
Where the soffit meets the adjoining wall, acoustical caulking should be used at the intersection of the soffit drywall and the wall.
Maintaining an airtight assembly is an important part of acoustical performance.
Even when the primary isolation system is properly installed, gaps and unsealed joints can create flanking paths that reduce the effectiveness of the overall assembly.
Fire Requirements Must Be Considered
Soffit assemblies can also create challenges when the ceiling is required to meet a specific fire-resistance rating.
Depending on the assembly and local requirements, the soffit may need to be pre-rocked or otherwise detailed to maintain the required fire-resistance rating.
Fire-resistance requirements can vary based on the project, jurisdiction, tested assembly, and applicable building codes.
Always verify the required fire-rated assembly and installation details with the applicable code requirements and local authorities.
Approach 2: Soffits in Spring-Hung Ceilings
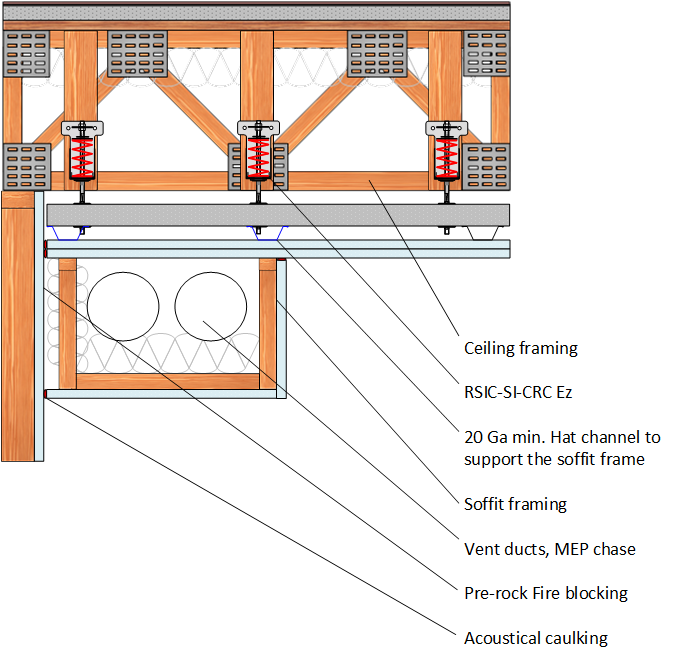
For projects requiring higher levels of acoustical performance, a spring-hung ceiling can provide another approach.
In this configuration, the primary ceiling is fully isolated using spring hangers and runs continuously across the room.
The soffit is then framed below the acoustical ceiling, using the isolated ceiling as the supporting structure.
One example uses the RSIC-SI-CRC EZ full spring hanger system to support cold-rolled channel framing and heavy-gauge furring channel.
The furring channel supports the specified layers of gypsum board.
Supporting the Additional Soffit Load
A soffit adds concentrated weight to the ceiling system.
That additional load needs to be considered when designing the spring-hung ceiling.
Where necessary, additional spring hangers—or springs with increased load capacity—can be incorporated to support the additional weight of the soffit framing and gypsum board.
This is an important distinction between a conventional ceiling and an acoustically isolated spring-hung ceiling.
The suspension system isn’t simply supporting the ceiling finish; it may also be supporting additional architectural elements.
Use Heavy-Gauge Hat Channel
When the soffit is fastened through the gypsum ceiling into the supporting framing, heavy-gauge hat channel should be used to reduce the possibility of fastener pull-out caused by the concentrated additional loading from the soffit.
The appropriate gauge and configuration should be determined based on the specific project requirements and load conditions.
The goal is to provide the necessary structural support while maintaining the isolation provided by the spring-hung system.
Installation Sequence Matters
For a spring-hung ceiling with an integrated soffit, the installation sequence is important.
Step 1: Install the Complete Spring-Hung Ceiling
Begin by installing the complete spring-hung ceiling from wall to wall.
The primary ceiling should remain continuous and should be designed to provide the required acoustical performance.
Step 2: Frame the Soffit
Once the isolated ceiling is installed, frame the soffit below the ceiling.
The spring-hung ceiling becomes the supporting structure for the soffit.
Because the soffit adds additional loading, the suspension system should have been designed accordingly.
Step 3: Insulate the Soffit Cavity
Once the framing is complete, insulate the soffit cavity as required by the assembly design.
The cavity insulation can help improve the acoustical performance of the soffit assembly.
Step 4: Finish With Gypsum Board
Install the specified layers of gypsum board to the soffit framing.
The final assembly should maintain the required acoustical and fire-resistance details.
Step 5: Seal the Perimeter
Finally, acoustically caulk the intersecting joints.
This includes the perpendicular joints associated with the isolated ceiling as well as locations where the soffit intersects adjoining walls.
Maintaining a continuous, airtight perimeter helps prevent unwanted sound transmission through gaps and joints.
Which Approach Is Right for Your Project?
Both RSIC-1 and spring-hung systems can be used to address soffit applications, but they serve different project requirements.
RSIC-1 can provide a practical approach for isolated ceilings where a resilient clip-and-channel system is appropriate and the soffit can be framed below the isolated ceiling.
RSIC-SI-CRC EZ spring hangers provide a solution for projects requiring a higher-performance isolated ceiling and where the suspension system must accommodate additional soffit loading.
The right choice depends on several factors, including:
- Required STC or acoustical performance
- Ceiling height and available plenum space
- Soffit size and configuration
- Additional structural loading
- Fire-resistance requirements
- Gypsum board layers
- Mechanical and electrical penetrations
- Project-specific structural requirements
- Applicable building codes and tested assemblies
Keep the Primary Isolation System Continuous
Regardless of the approach selected, one principle remains especially important:
Protect the integrity of the primary isolated ceiling.
The best acoustical results are generally achieved when the primary ceiling remains continuous and free from unnecessary penetrations.
Every connection, penetration, transition, and perimeter joint should be considered as part of the overall acoustical design.
A beautifully designed soffit isn’t much help if it creates a path for sound to bypass the isolation system.
Designing Soffits for Acoustical Performance
Soffits don’t have to be an acoustical compromise.
With the right isolation strategy, designers can incorporate architectural soffits while maintaining the performance of the primary ceiling assembly.
Whether the project calls for an RSIC-1 resilient clip system or a spring-hung ceiling using RSIC-SI-CRC EZ, the key is to design the soffit and ceiling as one integrated acoustical system.
And because fire-resistance requirements can vary significantly by assembly and jurisdiction, acoustical and fire requirements should be coordinated early in the design process.
Need Help With Your Ceiling Assembly?
PAC International works with architects, designers, contractors, and building professionals to develop practical sound isolation solutions for challenging wall and ceiling applications.
Have a soffit, ceiling, or acoustical assembly that needs a closer look? Contact PAC International to discuss your project and find a sound isolation solution that works.
Explore the RSIC-1® and RSIC-SI-CRC EZ® to learn more about these sound isolation solutions.